How to read stroke diagrams
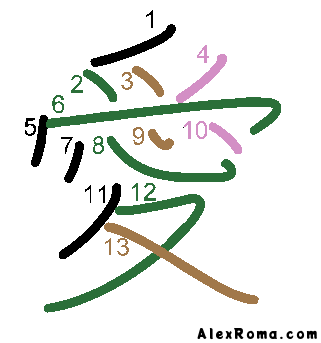
Before we start with the first of the twenty rules, let’s learn how to read stroke diagrams. Observe the diagram below, showing the character for ‘love’, 愛 AI.
The small numbers written next to each stroke are telling us two things:
- the order of the strokes;
- the direction of the strokes.
Stroke order: write the strokes in the correct order one by one, from the first one to the last one. In this case, from stroke 1 (black) to stroke 13 (brown).
Stroke direction: each stroke has, quite logically, two extremities:
- the extremity where the stroke starts;
- the extremity where the stroke ends.
A stroke starts where the pen first touches the paper, and ends where the pen is lifted from the paper. The small numbers in the diagram are located as close as possible to the extremities where the strokes start. For example, in the character above:
- The 6th stroke (green) starts at its left extremity, where the ‘6’ is located, travels rightward horizontally, bends downward in the shape of a hook, then it ends.
- The 9th stroke (brown), a very short diagonal stroke, is written with a descending motion, ending with a tiny hook that points North-East. The whole stroke resembles a small ‘L’ shape.
- The 12th stroke (green) starts from the top-left, where the ’12’ is located, moves horizontally toward the right, changes direction once, descends toward South-West, then it ends.